

I thought I was going mad when I ordered 6 Canelé molds from Amazon at $26 each. After doing my recent post on how to make Canelés using a silicone mold (‘French Canelés with Blood Orange Cadamon Sauce’), I just had to know if using copper molds was worth the extra investment. Copper molds are traditionally used in making these French Canelés de Bordeaux and some people swear this is the only way you can achieve the delicate fluted lines and crisp exterior of this wonderful pastry.
After placing my order for the copper molds, there was no turning back; money had changed hands, my reputation was on the line. When the molds and bee’s wax arrived from Amazon one week later, my nervous hands unwrapped each mold individually, not knowing what lay ahead.
After plowing through the various steps for baking Canelés in copper molds, I found that more work is required because you need to first coat them in a mixture of melted bee’s wax and butter. This can be a bit messy as the wax can end up stuck to your stovetop and even in your hair (just kidding!).
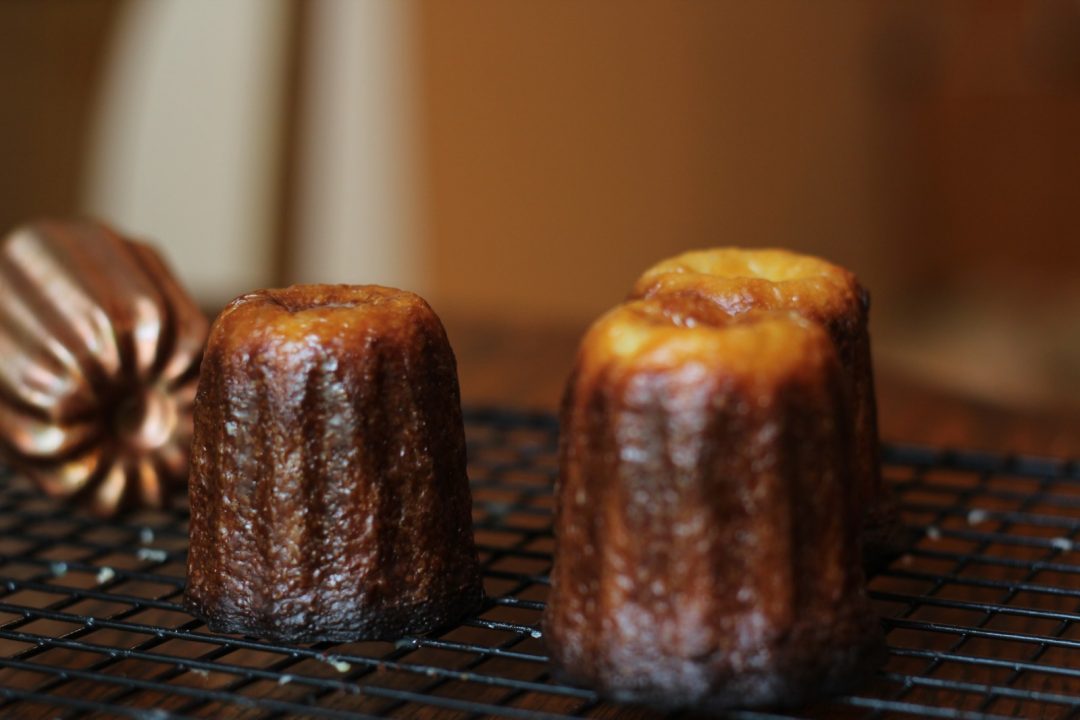
But, in the end was it worth it? My final conclusion was that the Canelés did not taste any better with the copper molds but the texture was much better. The combination of the bee’s wax and copper mold together produced that wonderful crispy exterior that was superior to the silicone molds. I felt I had almost arrived at the artisan level of the Canelé baker in Bordeaux!
However, if you don’t want to spend the money and the extra effort required for the copper molds, you can produce perfectly acceptable (and delicious) Canelés using the silicone ones.
If you are game (and I hope you are), here are the steps required for baking the Canelés in copper molds:
Step # 1- Seasoning the Molds
Before using your new molds, you need to ‘season’ them: first wash your molds in soapy water and then coat the inside of each one with either Crisco or vegetable oil, bake on a foil-lined tray for 1 hour at 360 F (180 C) with the open end facing up, turn the molds over and bake for another 15 minutes, then turn off the oven and let the molds remain inside the oven for another 15 minutes.
Step # 2 – Prepare the batter for the Canelés – (please refer to my blog ‘French Canelés with Blood Orange Cadamon Sauce‘)
Place the batter in the fridge for at least 24 hours to let it rest. This recipe makes about 12 Canelés.
Step # 3 – Coat the inside of each copper mold with bee’s wax and butter mixture
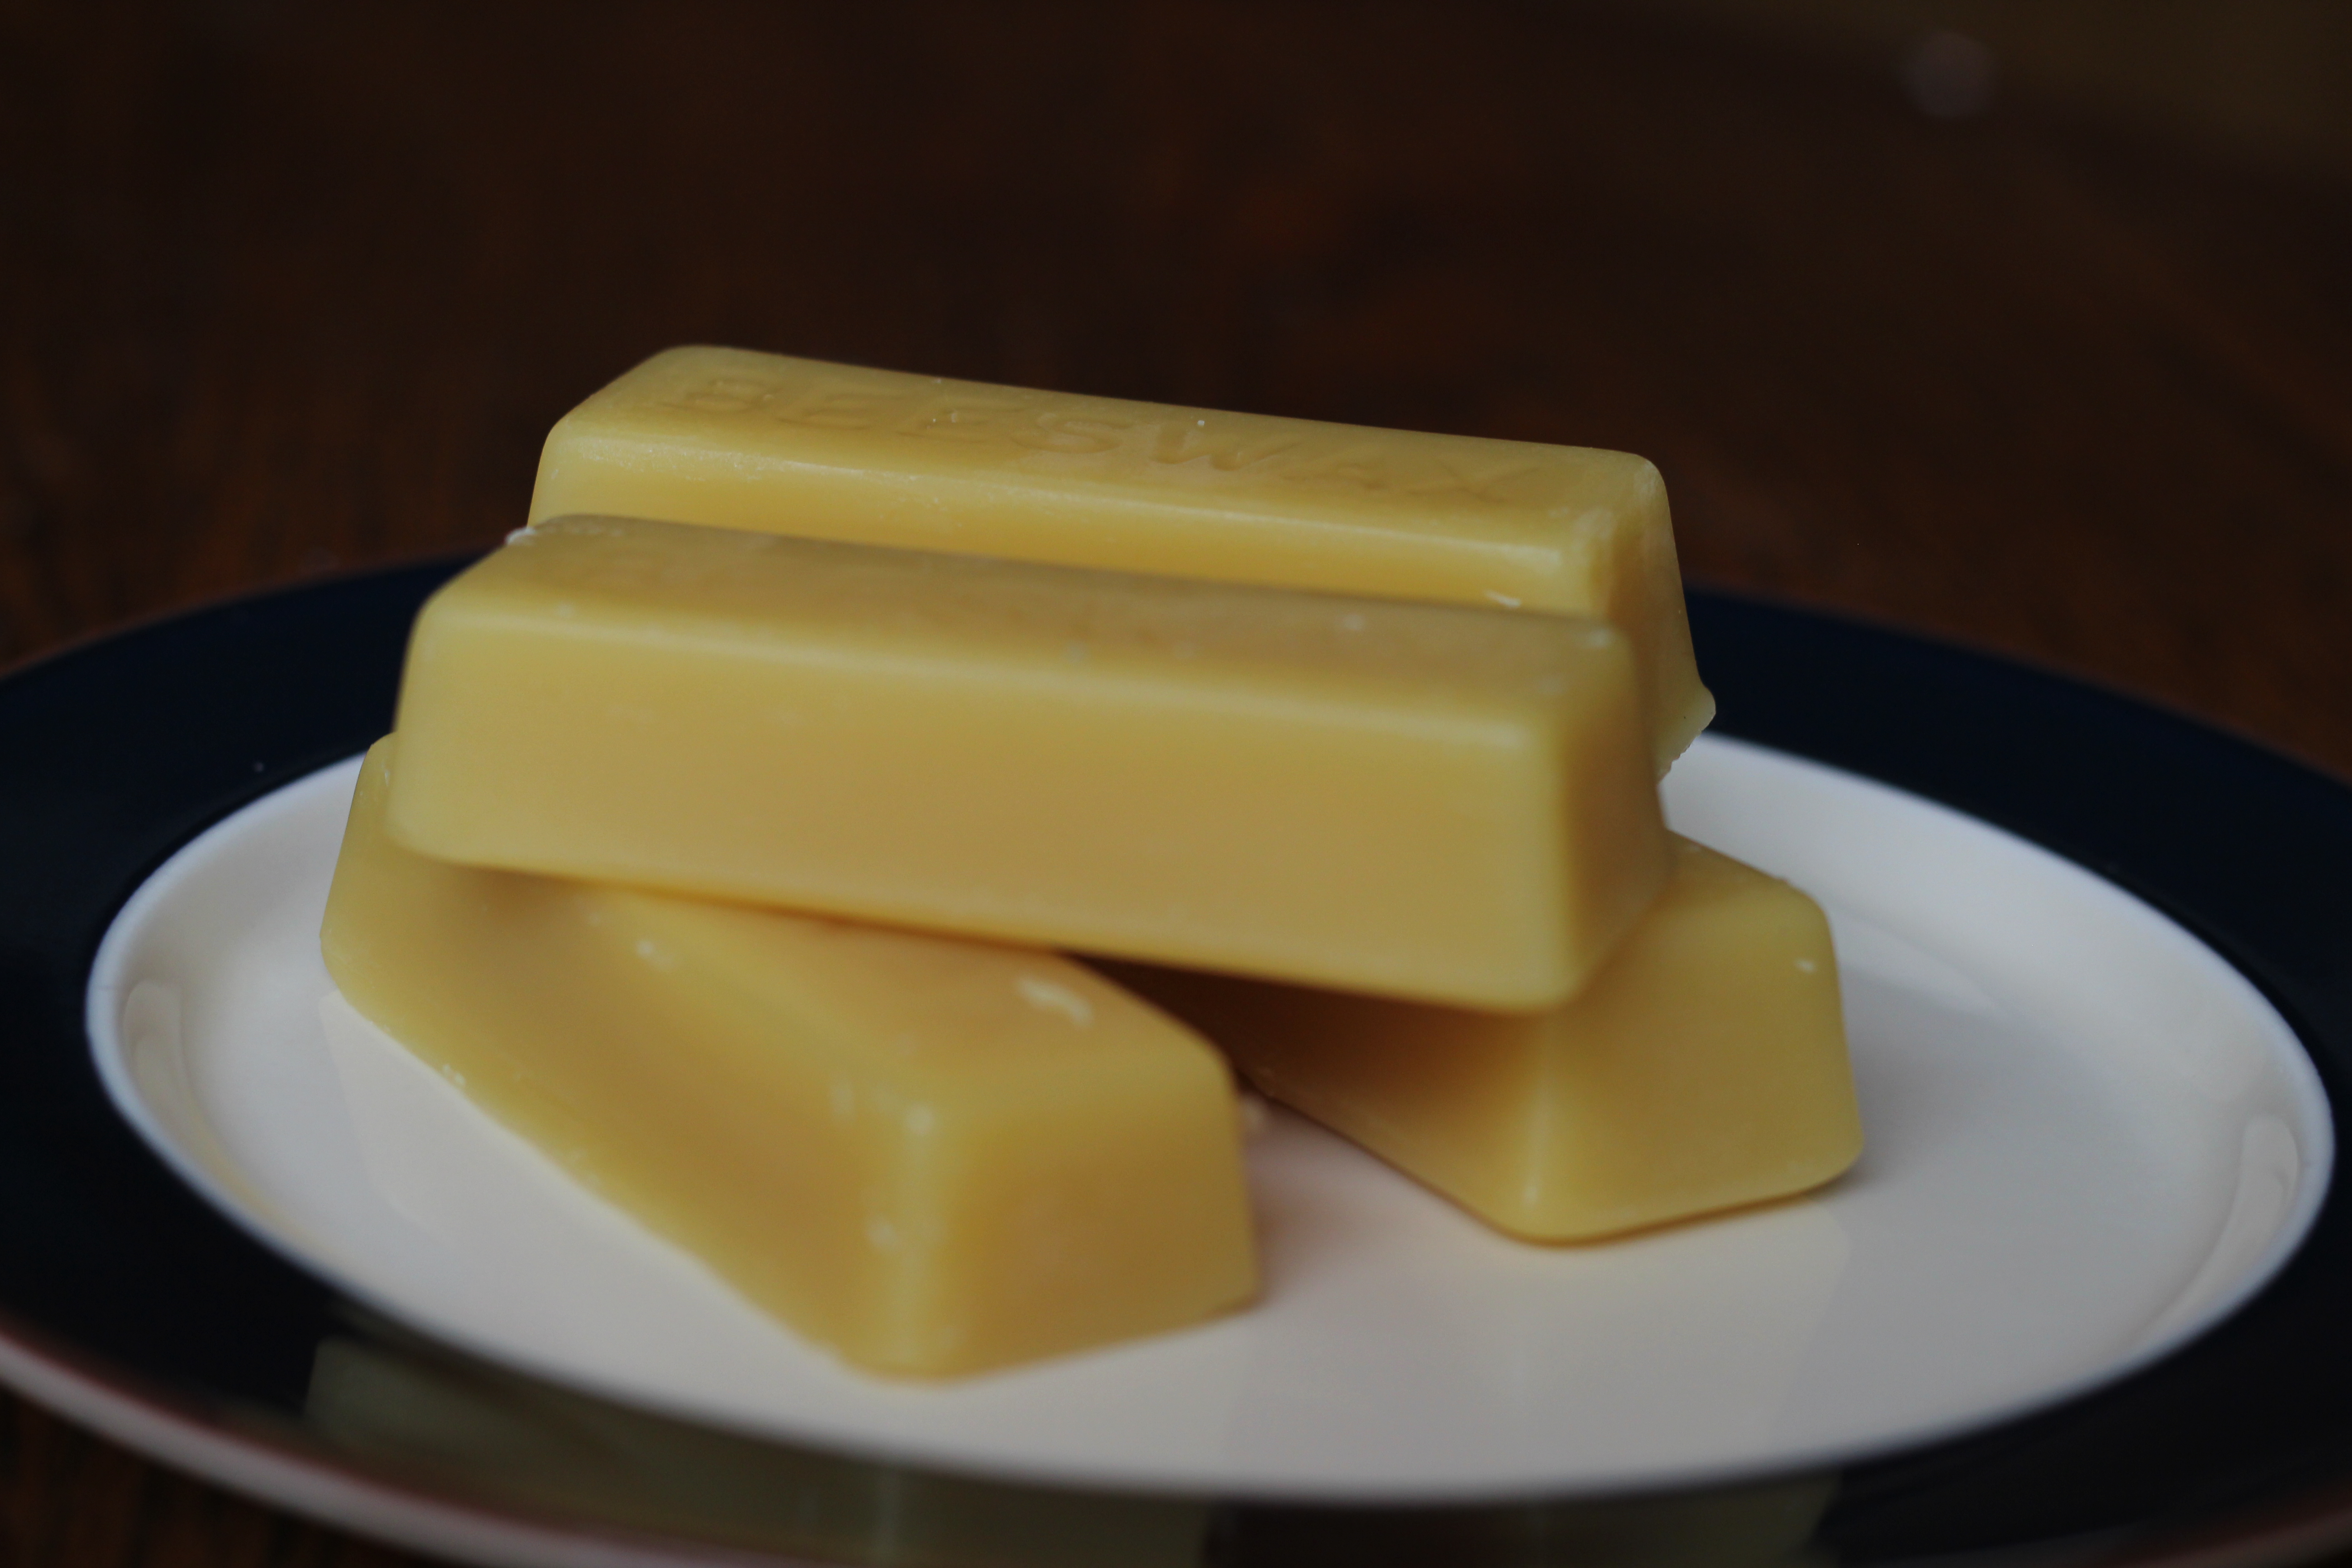
Bee’s Wax ordered from Amazon
Coating the inside of your molds with bee’s wax and butter will allow your Canelés to form a nice crisp exterior with fluted edges. You can do this step 1 – 2 hours before you plan on baking your Canelés.
Mix together your bee’s wax and butter using a 1:1 ratio. First, melt the wax either in the microwave oven or on the stove top. I melted one stick of wax (30 grams) in the microwave on a 3-minute setting. I then removed the wax and added 30 grams of butter and let it melt in the residual heat of the wax and then poured the mixture into a saucepan. You will periodically need to re-warm the mixture since the wax can very quickly start to solidify.
Now coat the inside of each mold with this mixture – be sure your molds are at room temperature (not cold) or the wax will adhere to your mold too quickly and not coat evenly.
Pour the warmed wax/butter mixture into one mold, filling it to the top, then quickly pour the mixture back into your saucepan. You should now have an even wax coating on the inside of your mold. Now let any excess wax drain from the mold by placing it upside down on a wire rack placed over a baking tray lined with parchment paper. Repeat this procedure with each mold.
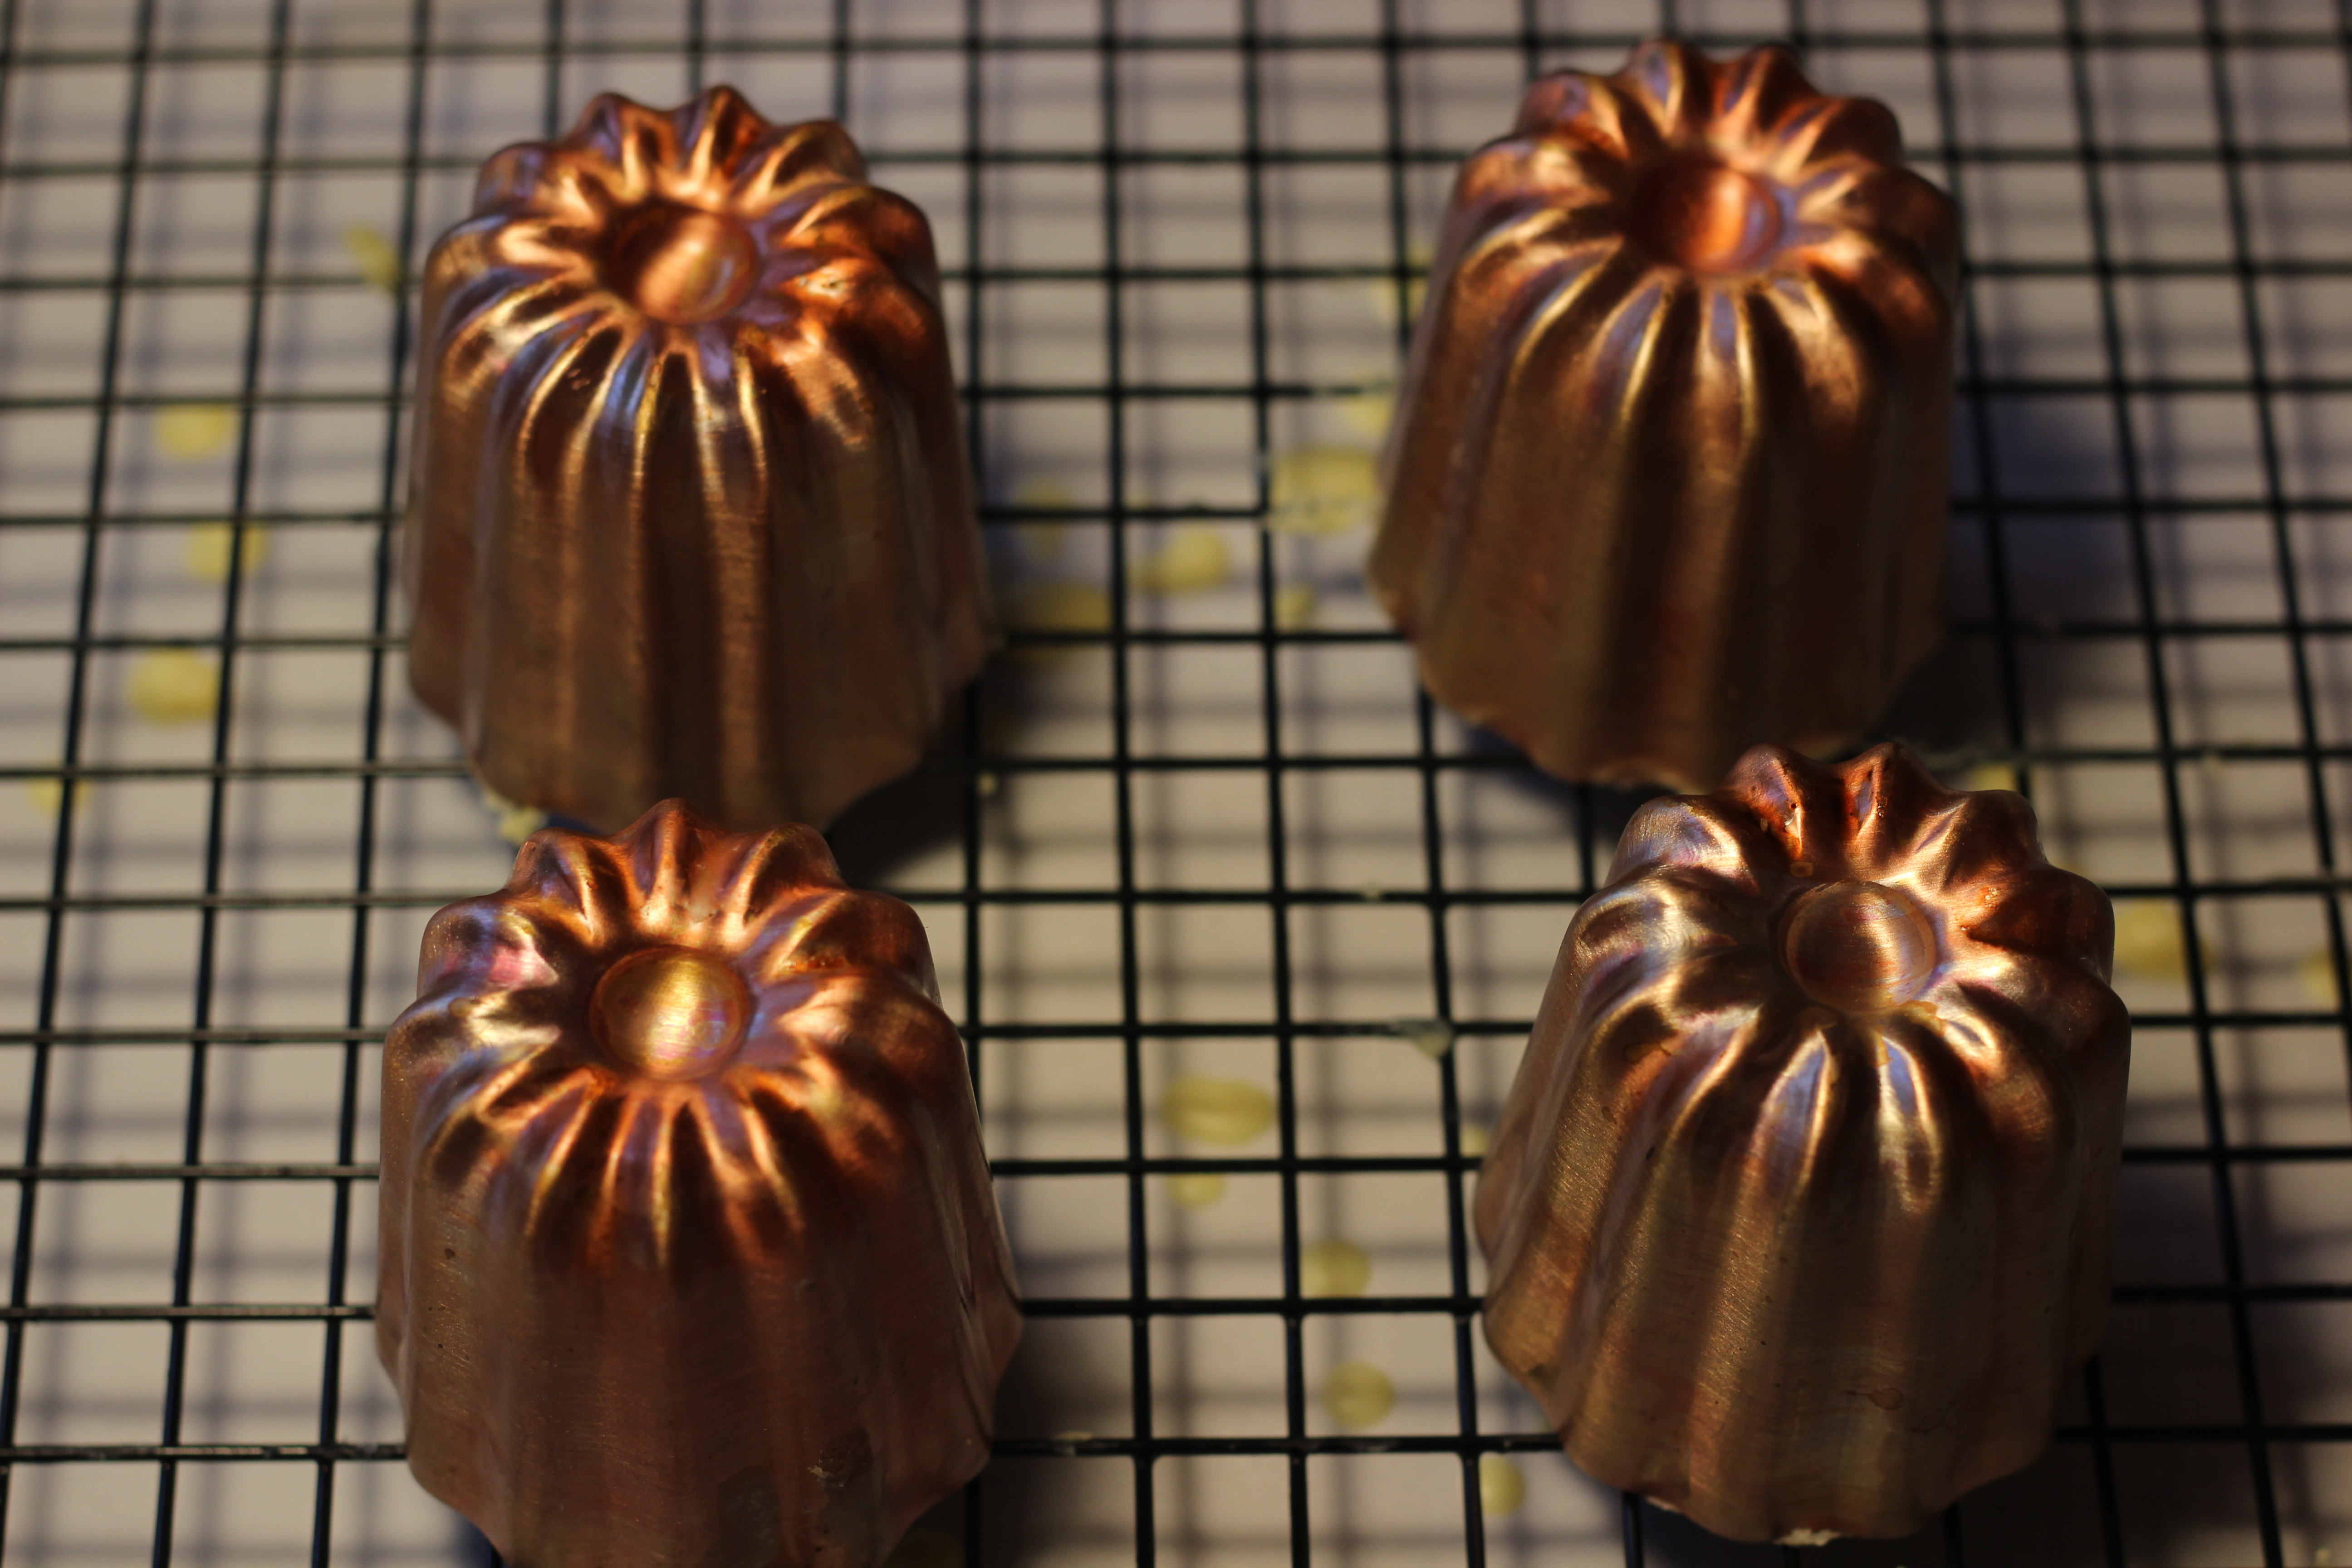
Letting the wax from the molds drain over parchment paper
Copper Molds coated with bee’s wax and butter
Step # 4: Place the molds inside the freezer for 30 minutes to chill them
This will help to produce the contrast between the crisp exterior while keeping the inside of the Canelé soft and spongy.
Pre-heat your oven to 460 F (235 C) along with a foil-lined baking sheet. Before placing the pastries in the oven, I use an oven thermomidor to ensure the temperature has reached the desired level. (Note: if using a fan-forced oven, reduce your oven temperatures accordingly to 440 F (225 C).
Step # 5: Fill the molds with the batter and bake
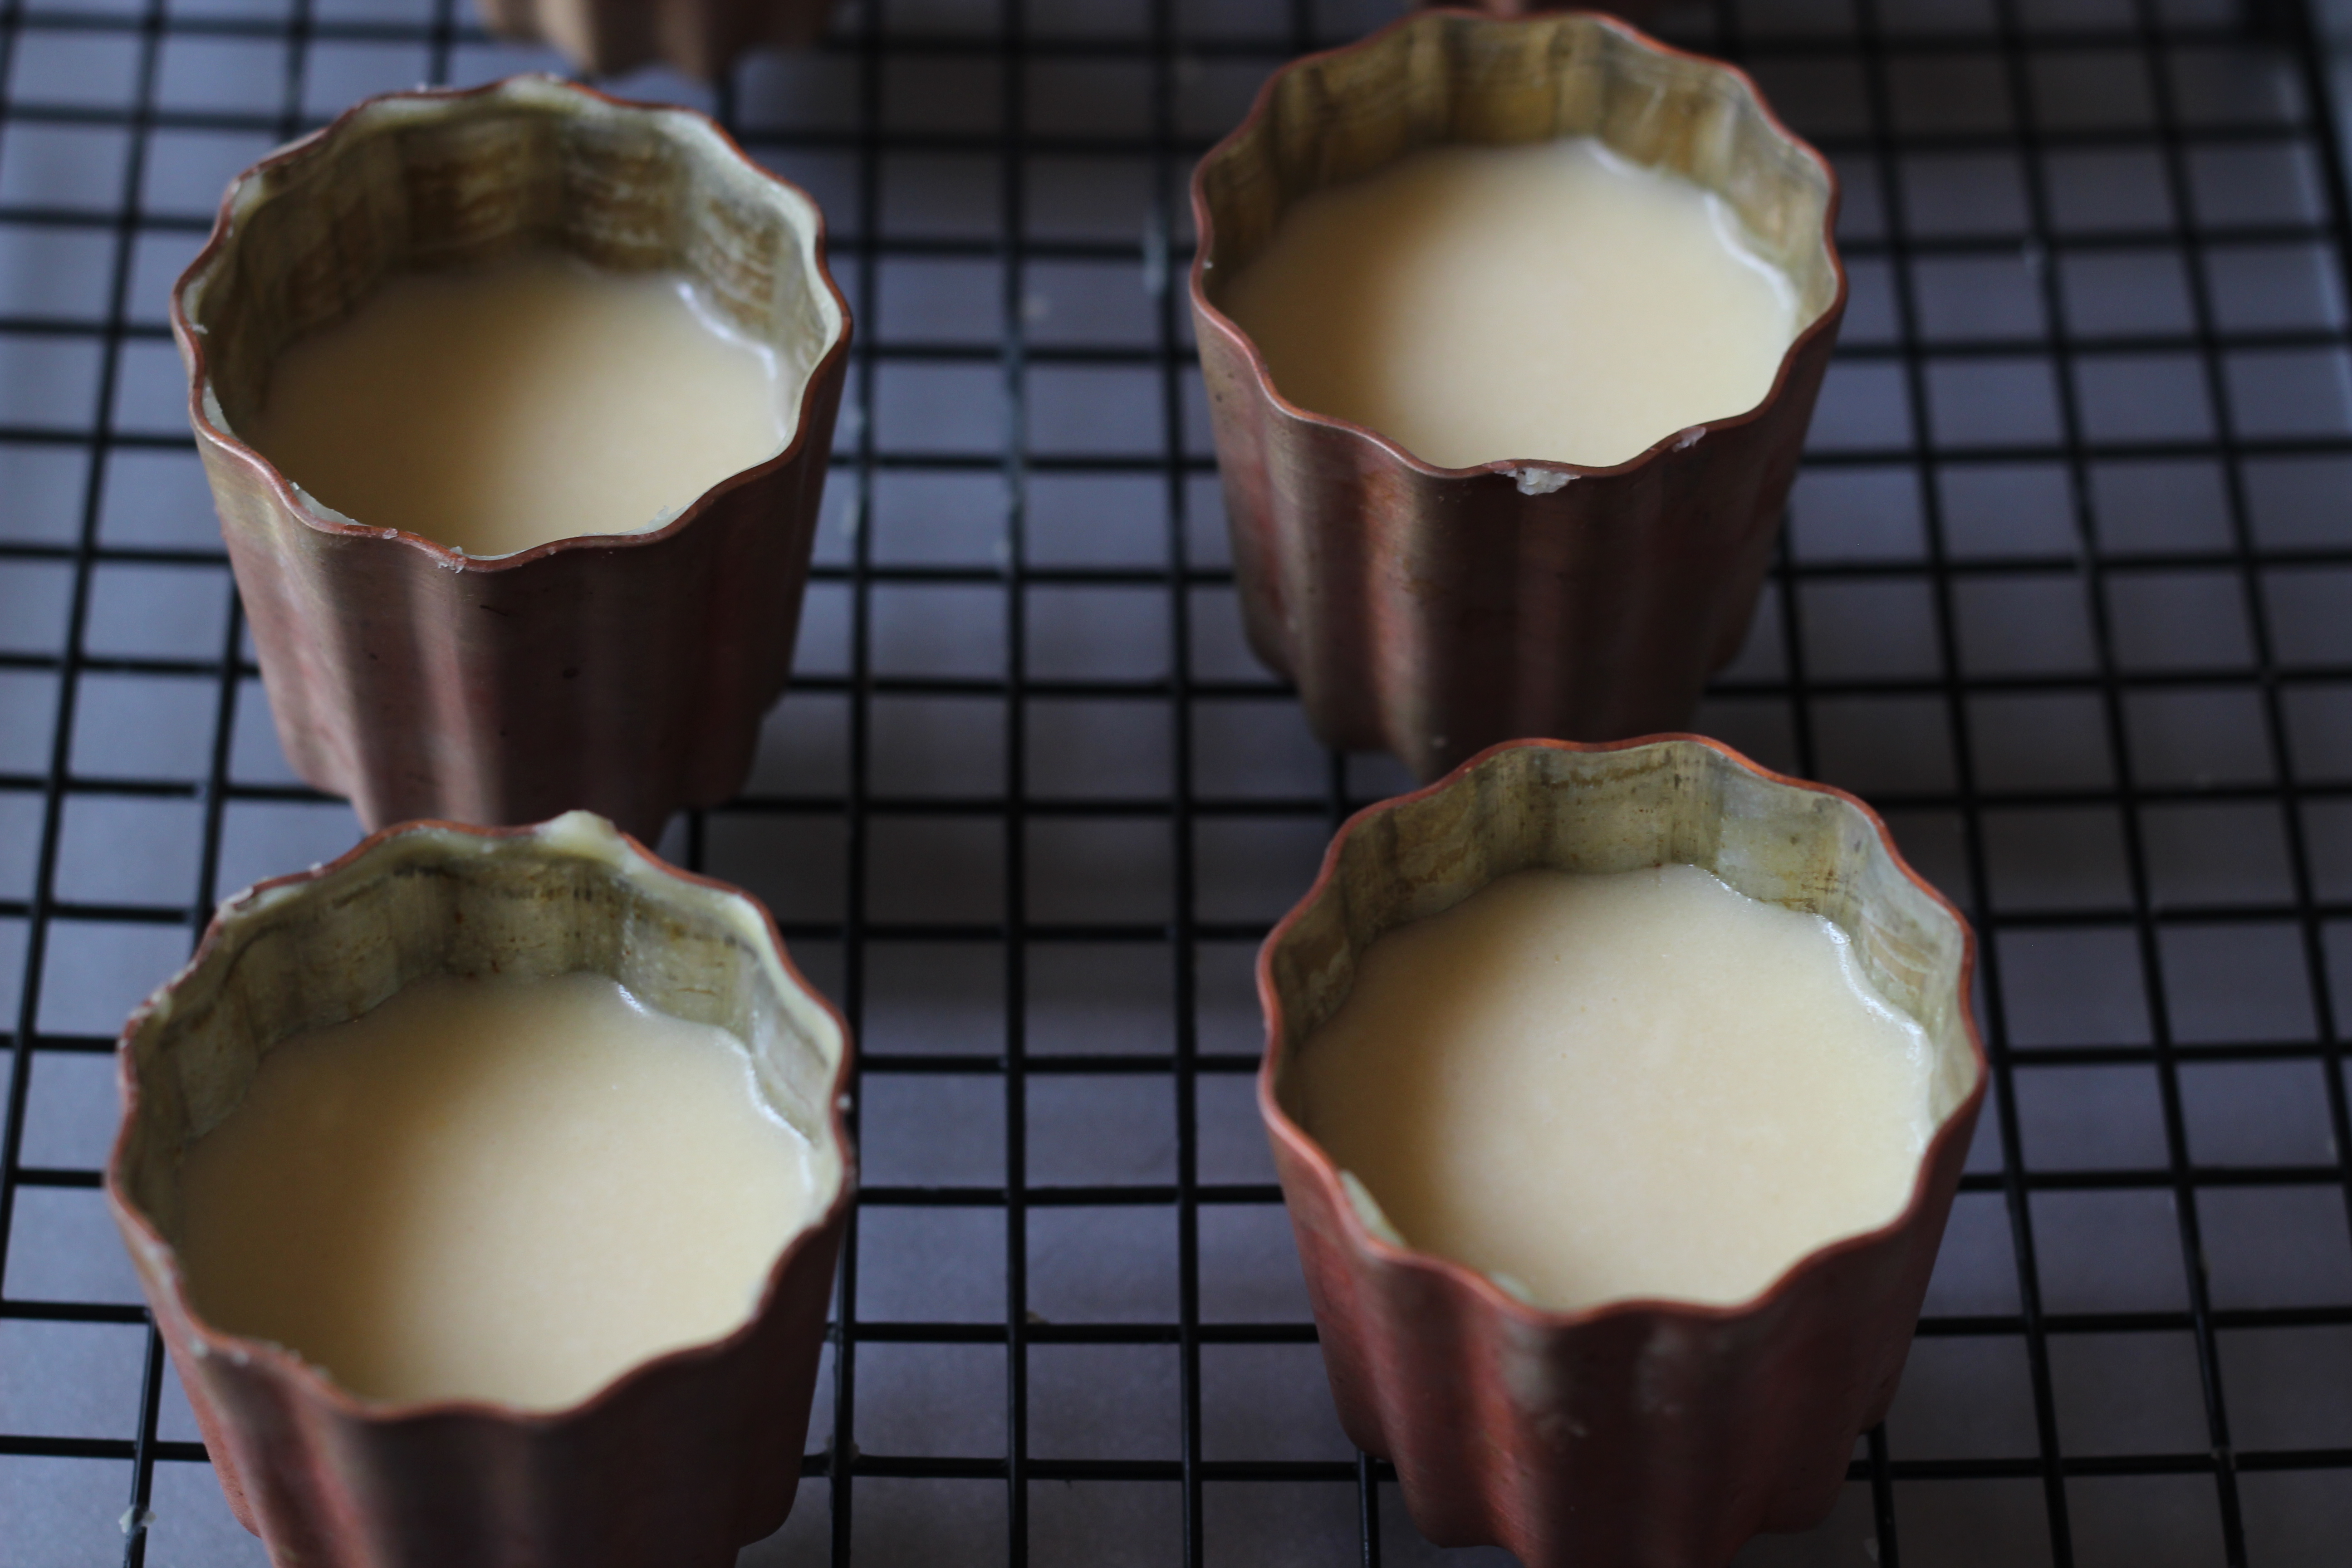
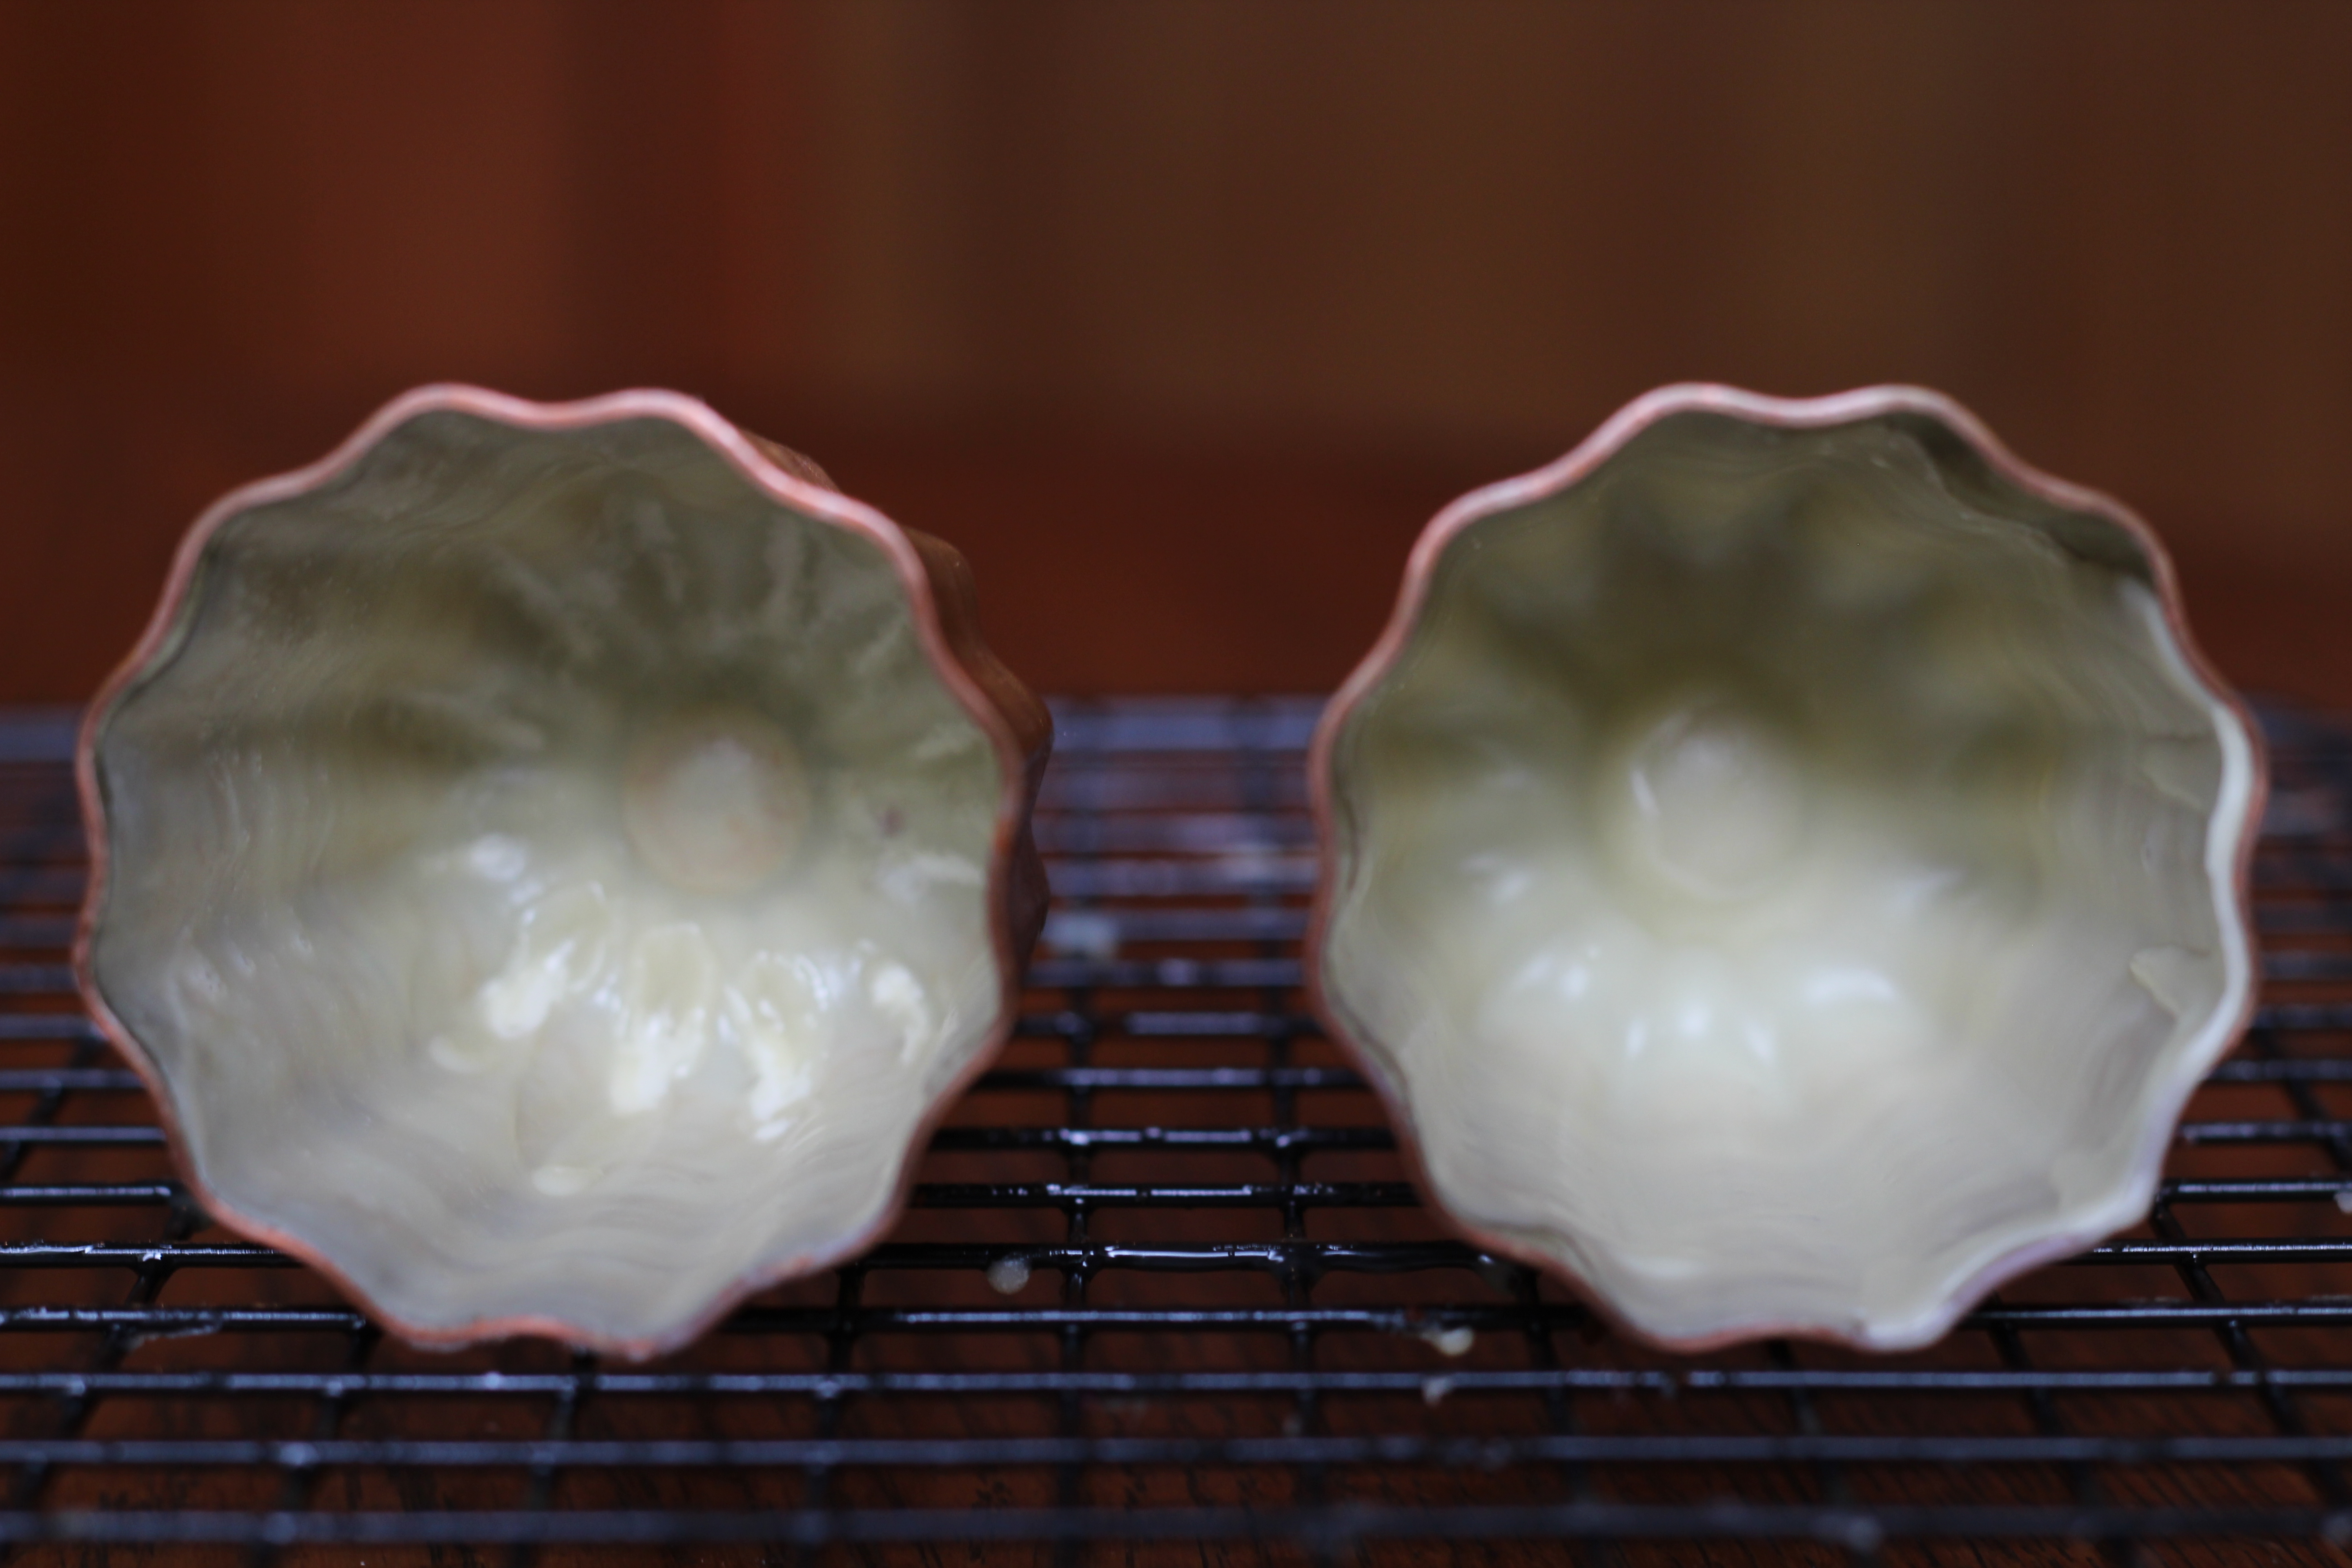
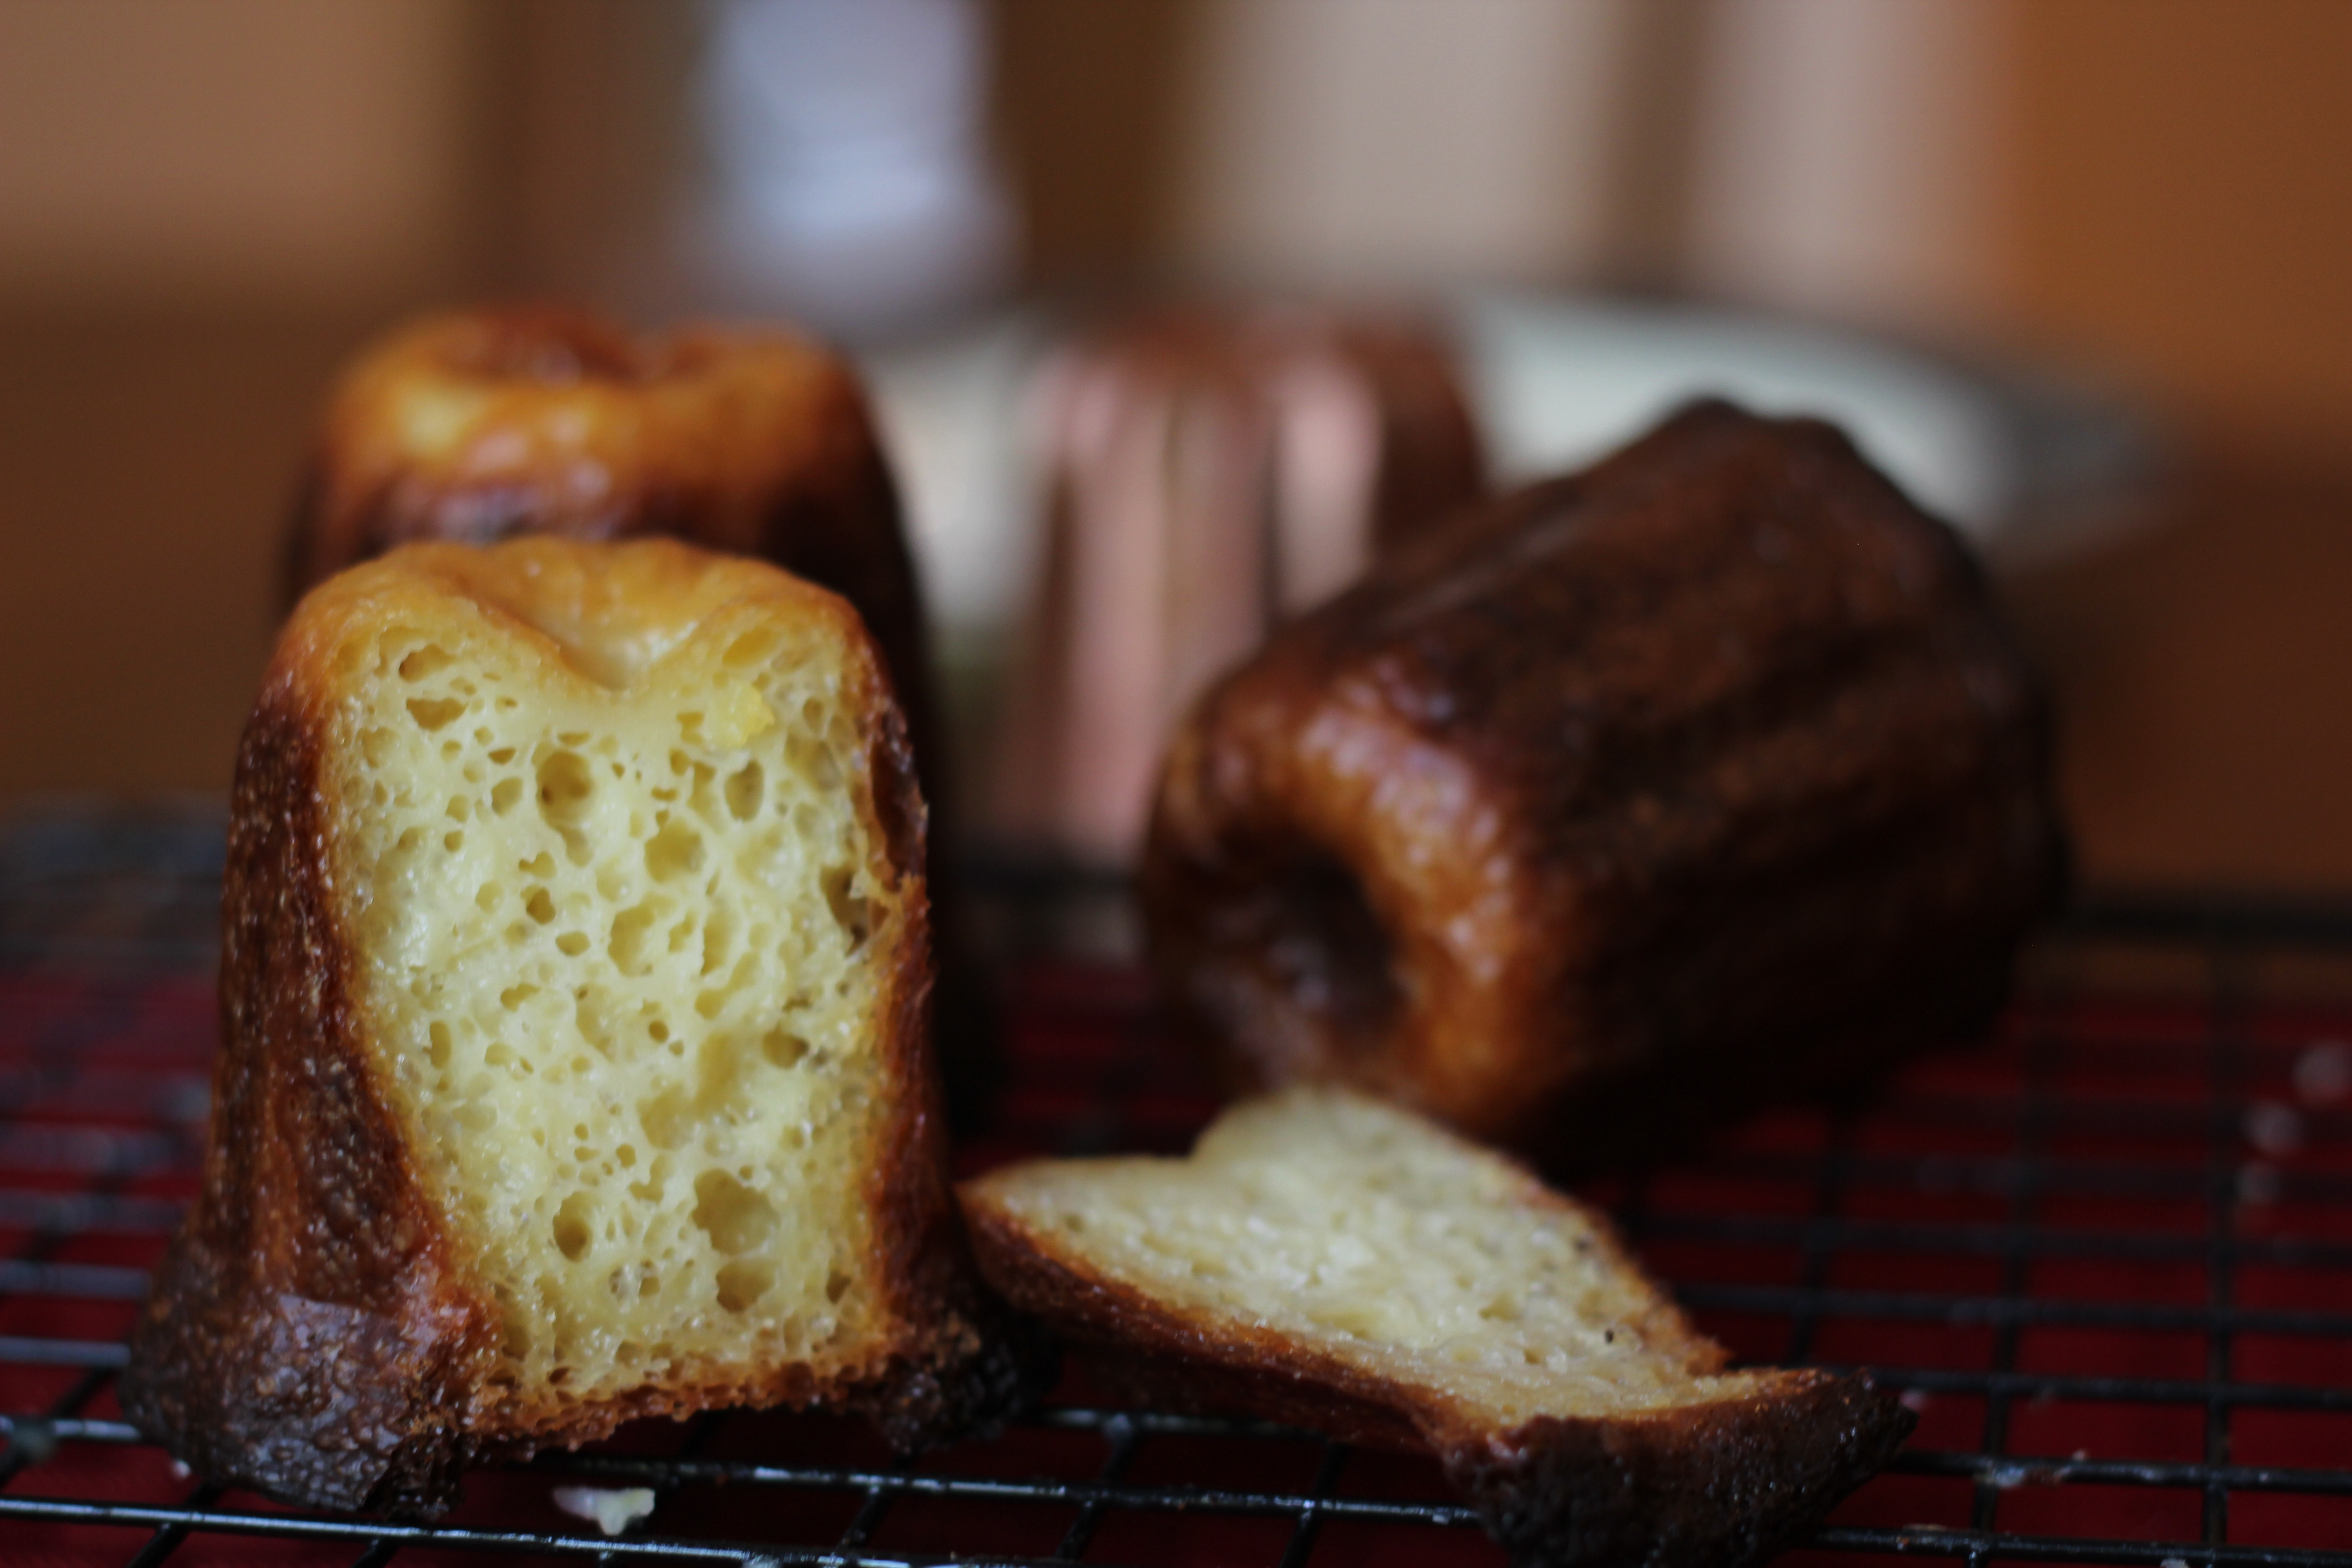
Remove the molds from the freezer and the batter from the fridge. Stir the batter before filling each mold about 3/4 full. Place the molds on the pre-heated baking sheet and bake at 460 F (235 C) for the first 15 minutes then reduce to 375 F (190 C) for the remaining 45 minutes. The outside of the Canelés should be crisp and brown while the inside is soft and spongy. If the inside of the pastries are still a bit uncooked, then bake for longer.
While the pastries are baking, open the oven door briefly to check on them. If they have puffed up too much and risen over the edge of the copper mold, remove them briefly from the oven to ‘de-puff’ and then place back in oven. If the pastries continue to puff up, you can simply remove them from the oven at the end and slice off the end so that it is flush with the edge of the copper mold.
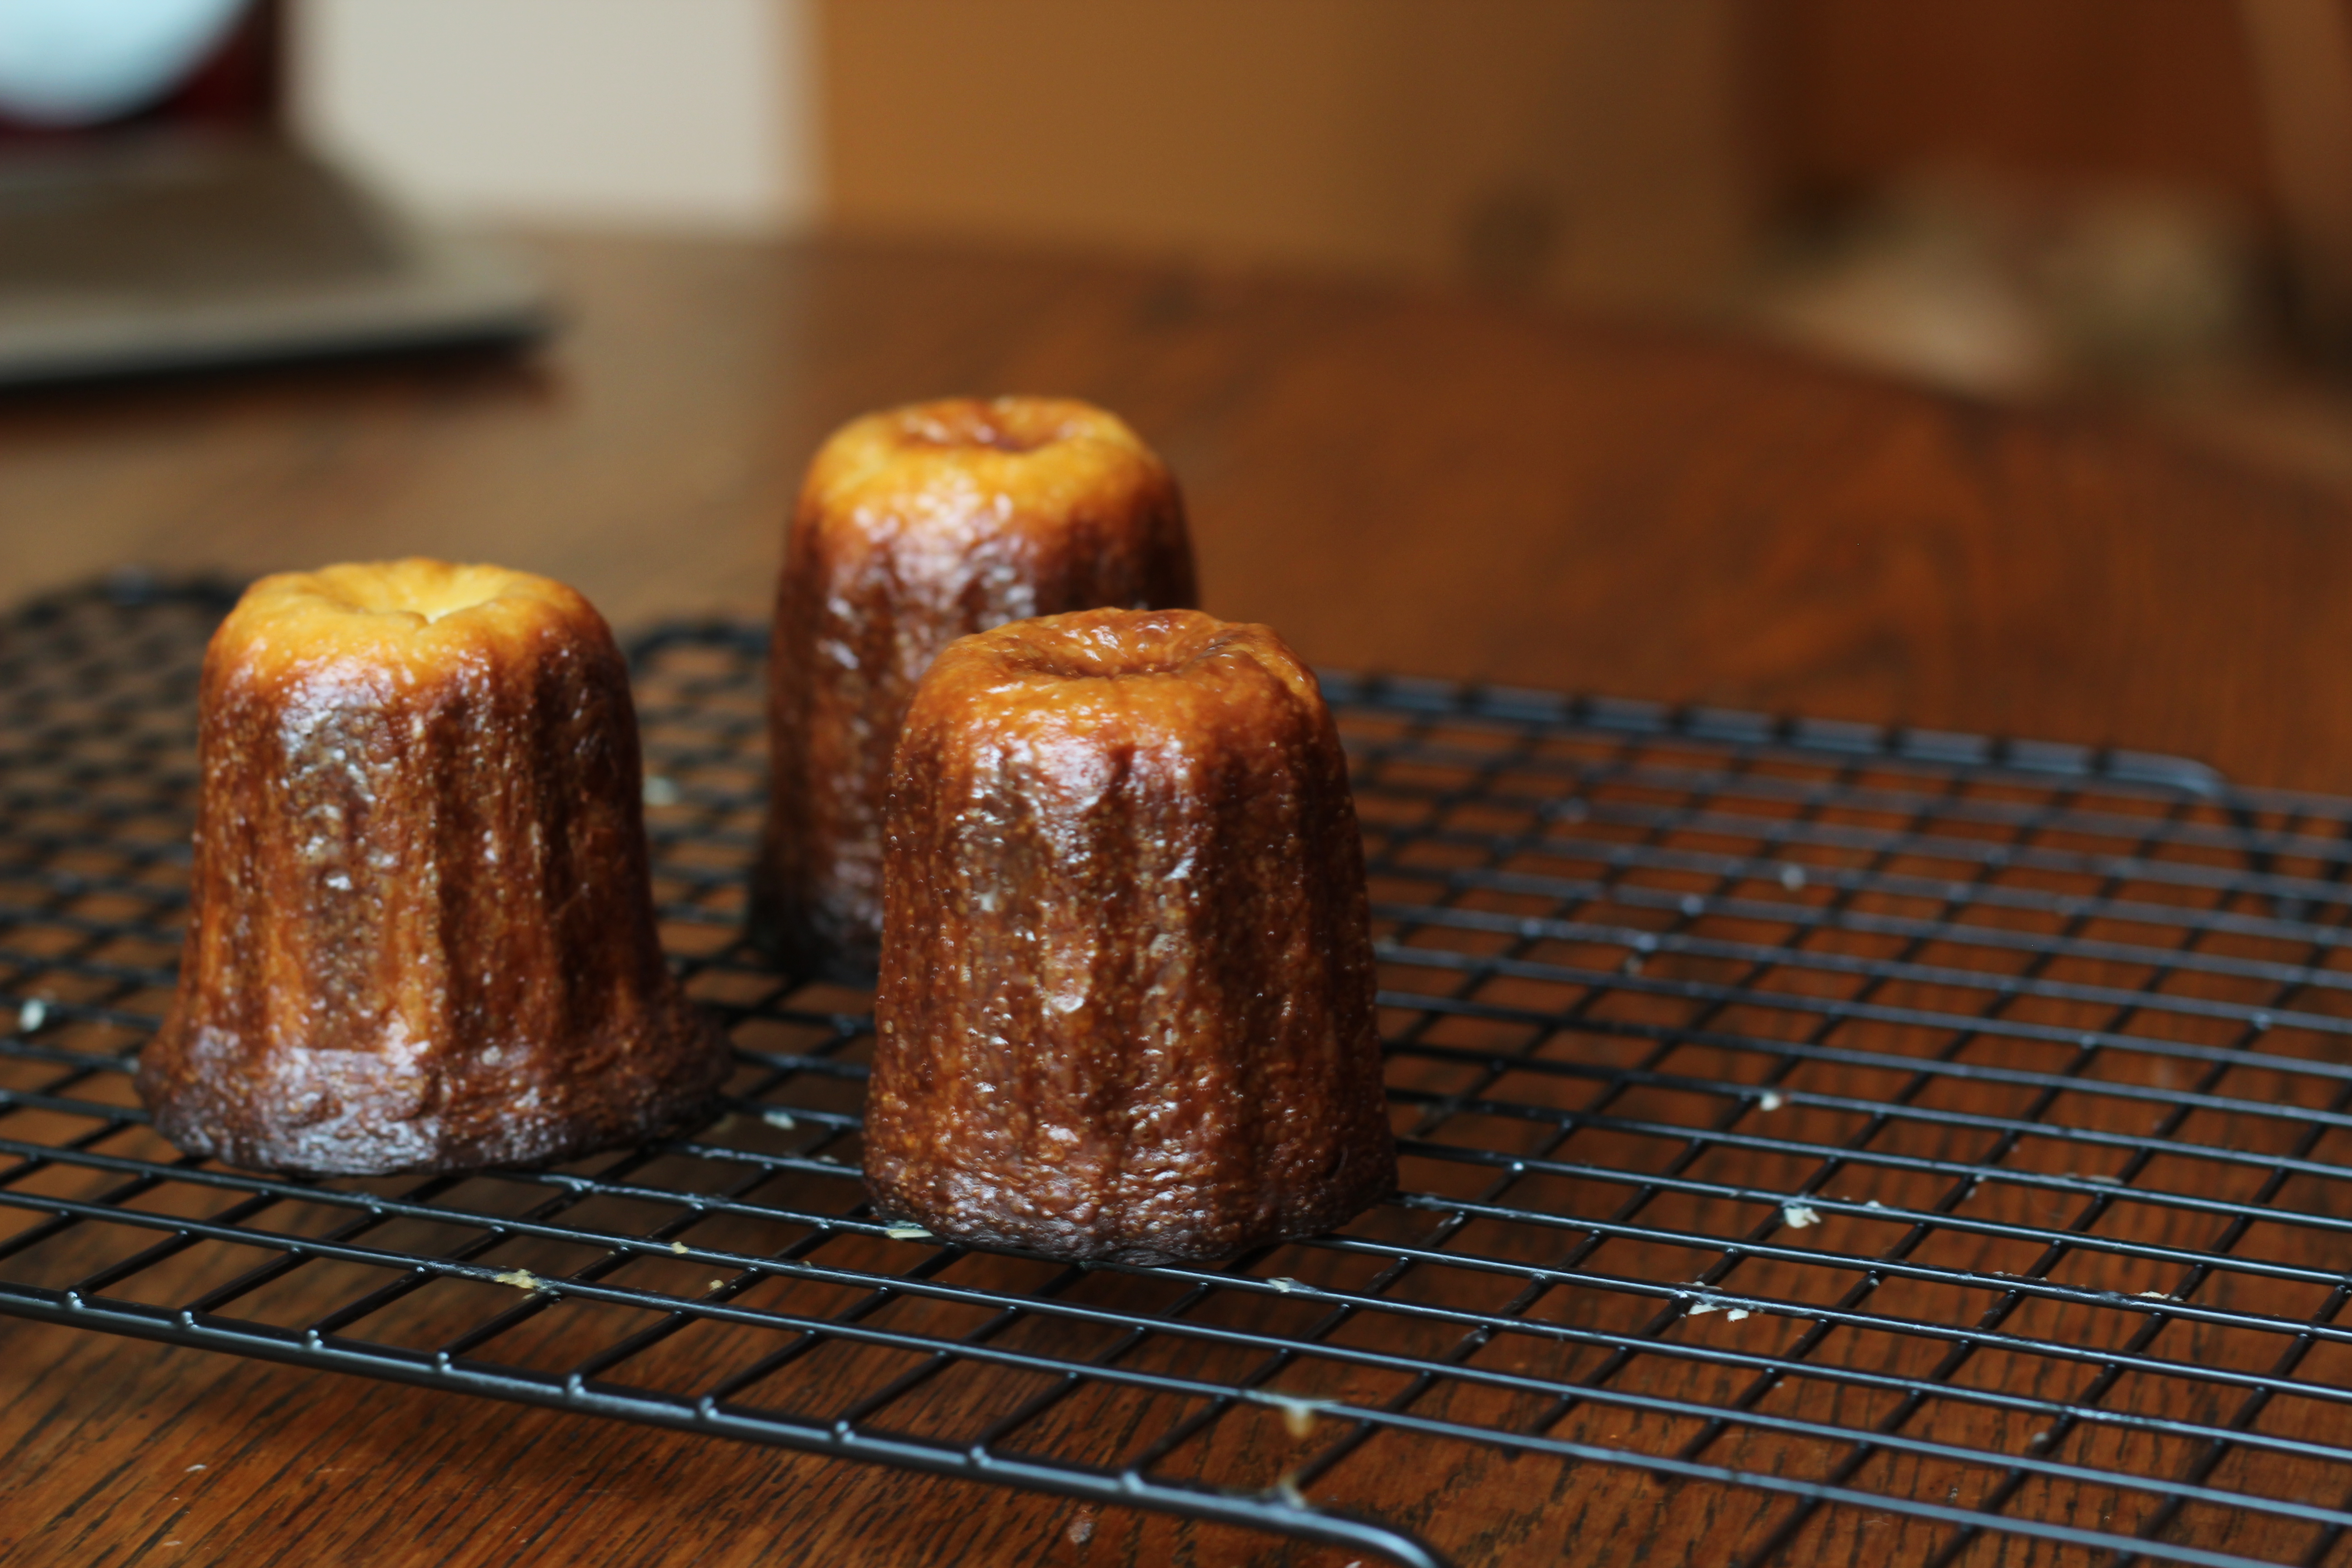
When the Canelés are cooked, remove from oven; using an oven mit, tip each mold oven and ‘coax’ the pastry out of the mold (I used the end of a spoon to coax mine out – they should come out easily). Let cool on a wire wrack and then serve – they can be stored in the freezer prior to serving for up to one month.
I’d love to hear your comments about this recipe – what sort of experiences you have had with making Canelés and any questions you may have!


38 Comments
Maureen | Orgasmic Chef
September 2, 2013 at 11:40 amEvery pastry baker’s dream – copper canelés molds. These look so good but for the price, I’ll go for silicone. I can only dream about copper. 🙂
Fran
September 2, 2013 at 8:52 pmThanks Lorraine for your comment. For you living in Australia, it might be even more expensive to buy the copper molds (moulds), due to the extra shipping costs… silicone, here we come!
Simply Sweet Justice
September 3, 2013 at 12:25 pmI’ve always wondered about baking in copper, so thanks for sharing such an informative post! These look like such a treat. 🙂
Fran
September 5, 2013 at 8:42 pmThanks for your comment- they are a bit of work, but worth the trouble!
Anneli (Delicieux)
September 3, 2013 at 8:36 pmI applaud your commitment to making your caneles authentic and as good as they can be. This is a great post with wonderful instructions. Yours look totally professional and pretty perfect to me 🙂
Fran
September 8, 2013 at 6:08 amThank you Anneli, that’s truly a complement coming from someone who lives in France!
GourmetGetaways
September 4, 2013 at 11:18 amWOW!! What a commitment to canales :-0!
I am definitely going to have to try this treat. I might need to go to France though 😉 … I am not sure I can do as good a job as you have, yours look amazing!!
Fran
September 8, 2013 at 6:09 amThanks GG- the extra work to make these pastries is well worth the effort!
john@kitchenriffs
September 5, 2013 at 9:04 amTerrific post! And thanks for doing the research for us. I’m OK with silicone, though I’m tempted by the texture improvement of the copper. And those molds do look so pretty! Anyway, really good stuff – thanks.
Fran
September 8, 2013 at 6:16 amThanks, John, for your comment- I’m debating whether or not to buy 6 more molds!
Juliana
September 5, 2013 at 1:24 pmWow, copper molds, they look so pretty…and the canelés look awesome Fran…compliments to the chef 😀
Hope you are having a wonderful week!
Fran
September 10, 2013 at 1:30 amThanks for your comment, Juliana.
Amanda
September 7, 2013 at 5:19 pmI do love your moulds – they look beautiful, as do your caneles. Well done you!
Fran
September 10, 2013 at 1:44 amThanks, Amanda. Let’s hope the bee population continues to thrive in order to provide us with the bee’s wax to make these Canelés!
Nami | Just One Cookbook
September 11, 2013 at 2:57 amCanelé is so popular in Japan and every bakery has one and enjoyed eating it in s ummer. Now that I’m back in the U.S. it’s so hard to find! I have to make them myself…or need to go to a little more fancy bakeries. Your canelé looks absolutely beautiful! Thanks for experimenting the difference with using copper molds. It was fun reading your post!
CCU
September 15, 2013 at 8:57 amAuthentic as can be, I have never tried this delicious recipe before but it looks beautiful 😀
Cheers
Choc Chip Uru
Miranti
March 3, 2014 at 11:28 amI never use the silicone mold before. I’m still perplex about how to coat the mold with beeswax. I’m planning to use pastry brush to do so but never have a chance to. I don’t think canalés would be canalés without beeswax! Silly me!
I’m searching for a recipe that I don’t have to keep pushing the cake down to touch the bottom of the mold to avoid “white ass”. I saw that yours has slightly white ass too. Are yours perfect now? If so how do you do?
These are mine https://www.facebook.com/photo.php?fbid=570213956395721&set=a.293488594068260.70814.256679451082508&type=1&theater
Fran
March 3, 2014 at 1:05 pmThank you, Miranti, for your comment. In order to coat the copper molds with the beeswax and butter, do not use a pastry brush. It is too messy and won’t coat evenly. Instead, you first melt the beeswax and butter together. Then you simply pour the mixture into one mold so it is completely filled. Wait a few seconds, then pour the mixture back into the pan with the rest of the beeswax/butter mixture. Repeat with the remaining molds. The molds will then be lined with a thin coating of the beeswax and butter. The problem of the ‘white ass’ on top of the caneles is caused by the butter pooling in the crevices of the molds (I think). Mine rarely have that problem any more – I think it’s just a matter of practice and getting the heat right with your oven. I don’t bother to push the batter down while baking in the oven – I don’t know if that would help or not. Any way, keep practicing- the caneles taste so good you can’t stop eating them!
Miranti
March 3, 2014 at 7:06 pmI always do that with the copper molds. I never used the silicone mold before because I have about a dozen of the copper and never have to make more than that. My oven couldn’t take more than that anyway even though it’s a very good professional oven but putting cold mold, cold batter drop the temperature down too much.
The reason I planned to use pastry brush to brush in the beeswax is because the silicone mold came in a bunch not one at a time like the copper. To coat the mold wouldn’t be the same process as the copper for sure.
I think the reason that the cake raise is not because of the butter melt (my beeswax it much thiner than yours barely seen but can feel it by touch) but I think the whole cake “fluff” and lift itself above the bottom of the mold, create the air pocket that’s not hot enough to brown the bottom of the cake. I’m searching for the recipe that won’t fluff that much but I can’t find one and I don’t think it is the recipe anymore. It’s the method more than the recipe.
I use convection when I bake the canele. I might try next time without convection.
Did you freeze your waxed molds in the freezer before you fill the molds with batter?
Fran
March 4, 2014 at 2:23 pmHi Miranti, yes I freeze the waxed molds before baking them in the oven (see Step # 4 in my blog). Actually, I’ve never placed bee’s wax in the silicone molds before- I didn’t even coat them with butter or oil! But now that I use the copper molds, I’ll never go back to using the silicone ones again. I agree with you, I don’t think there is any perfect recipe to solve the ‘white ass’ problem- it’s just a matter of practicing and trying various oven temperatures and baking times! (BTW, I don’t think that ‘white ass’ is a problem- the caneles still taste delicious and the contrast in color makes them look interesting!)
Loreta
October 1, 2014 at 5:26 amThank you very much for advices, my molds from France will reach me next wek, so I really apreciate all tips.
Fran
October 4, 2014 at 3:00 amLoreta, I hope you enjoy your molds from France. They are definitely worth the effort. If you ever go to Paris, you can buy the copper molds at ‘A. Simon’ on the right bank for about $10 each.
Ali
April 21, 2015 at 12:53 amI just made caneles for the first time this morning and wish I would have found this page before I started. Lots of good tips! But my real question is, now that I’ve made them, how do I clean the molds? I experimented with wax in some molds, butter/sugar in others. A couple still have wax in them, and the butter/sugar baked on the bottom of other molds. To top it off, these are the small molds.
Fran
April 21, 2015 at 2:37 pmHi, Ali. After you season the molds, you are not supposed to wash them, otherwise you will have to season them again. I take a dampened paper towel and clean the insides of my molds of any leftover crumbs. Next time you use the molds, you will pour the new batch of melted wax inside the mold and this will melt the leftover wax residue. Regarding removing the butter/sugar mixture from the mold, it’s probably best to just use butter to line the molds, otherwise the sugar bakes onto it. However, if you are keen to remove all the wax after each use, just simply pour some more hot wax into the mold and this will automatically melt the old wax. Then quickly wipe out the inside of the mold with a paper towel before it hardens again. Good luck and thanks so much for visiting my blog!
TAra
May 29, 2015 at 12:37 pmThis is such a great post!! Thank you for being so detailed with images as well. I’ve made my batter, it’s in the fridge to make tomorrow. I was lucky enough to have some beautiful copper moulds sent from Paris (love my family!) so I will be using those and using your method of coating and baking. VERY excited!! Will let you know how they turn out ! xo
Fran
May 29, 2015 at 5:46 pmTara, thanks so much for your comment. I’m very excited to hear how your Canelés turn out.
James
October 4, 2015 at 9:11 pmDear Fran
Your post inspired me to take the plunge and make use of the copper moulds we bought on our honeymoon 2 years ago. Thank you for the excellent detail and photographs – as a resullt, my first attempt was actually pretty good! I have friends and family keenly awaiting the second effort. The cleaning tips above were also very helpful. Regards & thanks
James
Fran
October 5, 2015 at 7:26 amThanks so much, James. I was so happy to get your comment (blogging can be rather lonely until you get some feedback)! I hope your second attempt turns out well, and just be careful that the oven doesn’t get too hot.
jill weinstein
January 12, 2016 at 2:39 amare the copper molds you purchased tin lined…
thank you for your response
Fran
January 12, 2016 at 7:54 amJill, I purchased the Mauviel copper molds from Amazon and they are tin lined. I don’t have my molds with me right now, but I believe I bought the larger 2 1/2 inch molds. The copper molds are much better than the silicone molds. Thanks so much for your comment and good luck with your baking!
Marie
February 7, 2017 at 7:21 pmDear Fran,
Thank you so much for your informative and helpful post on making authentic Canelés. I ordered a set of copper Canelé molds from Amazon, as welll as the beeswax. Prior to finding your post I read a blog (by an experienced Canelé baker) to season the molds using butter in a 520F oven for an hour. This seemed very high temperature to me and butter tends to burn easily, I was sceptical, but I decided to adhere to the instructions. Fifteen minutes into the seasoning smoke was everywhere, I took the molds out of the oven just to see how burned my molds were. The interior of the molds had virtually turned black and the exterior dark and discolored. I was mortified. I let them cool and scrubbed as much of the burned butter debris off as possible, but to little avail; the interior of my molds are still a burned mess. I let them dry completely and now will try your method of seasoning but I’m afraid my molds may have been ruined. Do you think my molds are still usable? Also, the same blogger/baker instructs to bake the Canelés at a higher temperature than your recipe: 550F for the initial 10 minutes, then down to 375F to let Canelés bake for another 50 minutes. Do you think that’s too high; even for just the initial 10 minutes? I don’t want another mess on my hands. I feel discourage, any input you can give me would be very helpful!
Thank you!
Fran
February 8, 2017 at 2:00 amMarie, thanks so much for stopping by my blog. I’m sorry you had such trouble with your first attempts at making Canelés. I can’t honestly say whether or not your Canelés are permanently ruined. I can only suggest letting them soak some more to remove the burnt residue. The only way you can tell if they are ruined is to go ahead and make a batch of Canelés- if they turn out alright and the exterior doesn’t have the ‘burnt’ taste, then you know your molds are not ruined. Yes, I think that baking them at 550 F for the first 10 minutes is too hot; they will probably burn. In fact, my oven gets quite hot, so I sometimes bake them at a slightly lower temperature than my recommended 460 F (for the first 15 minutes). Each oven is different, of course. My recipe says to then lower the temperature to 375 F for the next 45 minutes, however I often find that my Canelés are done after only another 30 minutes. Again, each oven is different so you’ll need to practice a bit to get it right. BTW, seasoning the molds with butter was obviously not a good idea due to its low ‘burn threshold.’ Please let me know how your Canelés turn out and good luck!
Marie
February 8, 2017 at 5:01 amThank you very much, Fran, for your prompt reply!
I appreciate it very much. Since writing to you, after I soaking and scrubbing as much of the burnt debris on the interior, I followed your seasoning instructions; I wish I had found your blog first. However, due to the previous burnt residue I ended up with sticky brown substance running down the walls (the oil and heating process likely released some of the burnt debris), now I wonder if it’s safe to eat from. I’m thinking of soaking and scrubbing again, and one more time applying your seasoning method, in hopes this will remove most of the residual burnt-remains. I will proceed to make your Canale recipe and instructions, and will let you know how it turns out. And you are right, butter at 500F is a bad idea, I knew this insticutually when I initially read it, but thought an experienced baker must know better than me. Ha!
Thanks again Fran, I’m so glad I found your site!
Priscille Pepworth
September 22, 2018 at 7:16 pmHello Fran, I am from South Africa & I have just returned from a wonderful 2 weeks in France of which one area was Bordeaux! I could not resist buying the mini copper moulds. Once I have completed the “curing” of the moulds can they be washed after use or just wiped with a cloth for storing. I won’t be making them regularly.
Fran Flint
September 23, 2018 at 6:57 amWonderful to hear from someone from South Africa! The instructions say that the moulds can be washed with water after baking, but not to use soap since it would remove the seasoning effort. Sometimes if my moulds are not too dirty, I will just wipe them with a damp paper towel. Good luck!
Tomer
July 31, 2020 at 2:51 amFirst time baking caneles in copper molds. I followed this recipe: https://www.youtube.com/watch?v=TgncW0qxm3Q
I seasoned the molds with butter, but did not put in the freezer. Followed the recipe and baked for more than 1 hour total.
I the interior was completely uncooked, while the exterior was a bit crispy.
What could cause a problem that? Is it the recipe, or something else I did wrong? I am out of ideas…
Fran Flint
July 31, 2020 at 11:50 amTomer, thanks for dropping by my blog. First of all, the recipe you followed is completely different from mine, since it features a gluten-free recipe. The recipe you followed looks thicker than mine: I used 500 ml milk while the recipe you followed uses only 205 ml of soy milk. It looks thicker than my batter. Try following my recipe at https://www.gdaysouffle.com/french-canales-with-orange-cardomom-sauce/. See if it makes a difference!
Tomer
August 3, 2020 at 2:26 amI wanted to try a vegan recipe and only found that one.
Thought maybe you have an idea why that happened.
I guess its a problem with the recipe itself.
Thanks for the reply 🙂